
Panther earrings
Dane Little

AI ile Benzer Model Bul


Baskı Profili(0)
Model Dosyası(0)
 5
5 6
6 0
0
Yayınlandı:2025-05-26 22:02:22
10
0
 560
560This design is specifically created to provide a step-by-step tutorial, allowing people to start creating their own designs.
This project only uses free online tools to provide them to everyone.
This print configuration file and design are free to use, sell, or reproduce, as the focus of this design is to inspire others (it was created using AI).

This tutorial:
This article is a step-by-step tutorial on how to start designing and sharing a simple project, which you can try to get quick and easy results. Because nothing motivates people to learn more about design more than creating an effective design in about 30 minutes.
This tutorial uses online tools that don't require any installation or payment. The only thing you need to do is create a (free) account. If you are a minor, please obtain your guardian's permission first.
What is Tinkercad?
Tinkercad is a free web-based 3D design and modeling tool created by Autodesk, primarily aimed at beginners and educators. It allows users to create 3D models using simple geometric shapes through an intuitive drag-and-drop interface.
Why should we use Tinkercad?
It's user-friendly and very suitable for beginners.
It's free on the web and doesn't require installation
It supports STL, SVG, and OBJ files. We'll introduce this in more detail later.
Why not use Tinkercad?
Limited use: When you progress to more complex designs, you'll become aware of the software's limitations.
Limited size: The imported file can be up to 25 MB in size, but with a limited amount of detail.
Non-organic: The possibilities of creating smooth, organic shapes are very limited.
Which files can be imported?
STL => Basically, every design is floating around on Makerworld.
OBJ => About all AI-generated content from Makerlab or other maker tools
SVG => Convert the image to SVG
What are the possibilities?
Okay, this is part of the tutorial!
I want to show you a simple project. You can try to set up the first few steps by yourself and design your own things with 100% free tools.
AI usage: Gemini
Hint:Generate simple geometric images of animal faces.Thick black linesNo background, all linesAll are connectedYou are drawing because you are with the other personYou don't need to take out the pen when you're using it
Result:
Download the image in .jpg or .png format.
Go to“https:// convertio.co/svg-converter/”,Then select your image to convert it to SVG.

Download the newly created SVG image.
Go to“Tinkercad.com , create a free account and open a new project
Select "Import"
Choose your SVG file
And click Import
Waiting to import the image.
It will look like this:
Now - that would be some huge earrings. Make them smaller.
Just like with any other image scaling, you can select the files and resize them by standing in one of the corners and simply holding and dragging them.
For this design, it's very round and bulky. I want earrings that are about 1 inch x 1 inch or 2.5 cm x 2.5 cm in size.
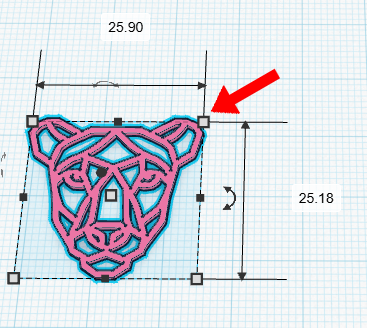
Of course, if you change the proportions, your design will become very flat.
Your design will be hanging on someone else's ears. It. Will. Break.
For earrings, I recommend a height of 1.6 mm (0.062992126 inches?).
Always use multiple layers of the height you intend to use. The layer height I use is 0.2, so my height can be divided into 0 and 2. (This is for 8 layers - it's useful to understand the math behind it)
Select the middle cube and change it to 1.6 mm. When you press the Enter key, the design will change immediately.
Now, we need something to put our earring hooks in.
During the test, I found that a 2-millimeter opening was perfect. When you're moving around, giving it some space allows it to hang nicely.
But we had nowhere to go. So we added a ring!
A ring is basically a cylinder with holes in it.
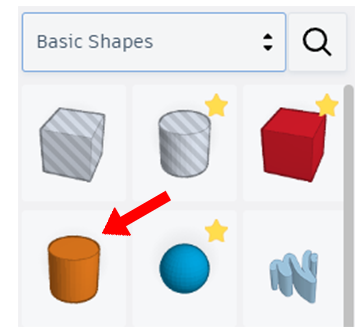
So, using our basic shape, we add a cylinder
In order to make it nice and round, you can maximize the sides.
However, it's too large. Therefore, we use the same technique as before to reduce its size, or we can enter the size manually.
Height: 1.6
Width (on both sides): 3, 4 mm - we don't want our rings to break when we're wearing earrings
Now we need to drill a hole.
Select your cylinder, copy it (Control+C) and paste it (Control+V). Now you have two of them.
Change the border to:
Width: 2 millimeters
Now, we need to make a hole in it.
Select the small cylinder, and then choose the "Hole" tab in the upper-right corner
Next step: put them together.
Select two cylinders (hold down the Control key and click, or click and hold the left mouse button, then drag the selection over the two cylinders)
Click the "Align" tool
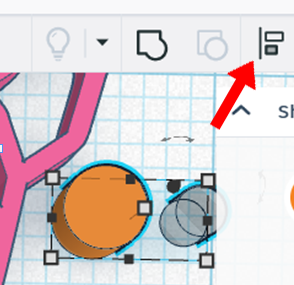
Select the bottom of the middle bell
It's on the left, next to the bell in the middle
Did you see that they've turned gray? This means they're 100% aligned.
<img src = "https:// lh7-rt.googleusercontent.com/docsz/AD_4nXd6CrZXHrQ0OYt41DysobKdh4sgQFUUbDpDmd5x0Av51JZbi2zYToe1ATuYwxP32ClKVQPH5RpA7nv_qUD2gETFqyEgQs4bRxVMwcjaj3dFwyCng19I_Wqxe



