
Desk Pencil Sharpener Holder (parametric)
Velin

AI ile Benzer Model Bul


Baskı Profili(0)
Model Dosyası(0)
 1
1 0
0 0
0
Yayınlandı:2026-06-01 07:10:35
0
0



 100
100Encase your wedge-shaped pencil sharpener for more convenient use in a workspace.
This holder can adapt to a variety of single and double blade sharpeners. The sharpener must be a wedge or block shape, with 2 sets of parallel faces excluding the side holding the blades.
2 M3 socket cap screws ranging from 6-16mm in length will be needed, shorter screws are ideal.
Holder dimensions are adjusted through the provided Blender file, ensure you are running version 4.4 or later. STEP files for all printed parts are also available, with preconfigured holder/lid files for double insert sharpeners such as this one (also the default configuration in the .blend).
The .blend base collection contains the objects (1)Sharpener (2)Holder (3)Lid, select each to adjust their parameters in the modifiers panel. Edit objects in their listed order, further details are below:
Input measurements into (1)Sharpener object: Height, Width, Major Length, Minor Length, Minor Skew
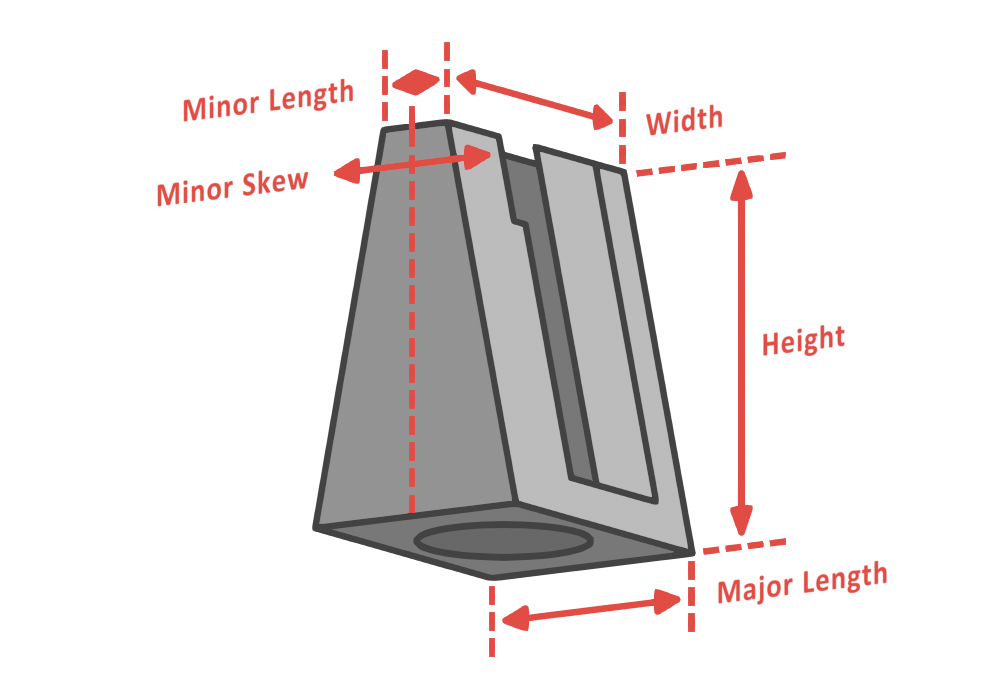
The following are parameters within the (2)Holder object:
| Parameter | Description |
| *Holder Size | Select between a double or single sized holder based on what best fits your sharpener. |
| Part Tolerance | Sharpener/holder interface tolerance. |
| Holder Thickness | Thickness of material surrounding sharpener. |
| *Holder Lip | Overlapping part of holder which keeps sharpener in place. Check to ensure lip does not overlap blades. |
| *Thread Length | Depth of threading pieces for screws. Also act as supports, keep a high value when possible. |
| Thread Thickness | Thickness of threading material surrounding screws. |
| *⌀ Screw Hole | Input a value that allows screw to effectively thread into plastic. 3mm is a good starting point. |
| Chamfer Screw Hole | Chamfer at screw insertion points (setting to 0 will break mesh). |
*notable values to adjust
This part is low-cost to facilitate rapid iteration. An ideal fit provides little resistance upon insertion with minimal give on all axes. The sharpener's top face should be flush with the holder's first layer. Ensure screws can effectively thread into the plastic, adjust dimensions and tolerances as necessary.
The following are parameters within the (3)Lid object:
| Parameter | Description |
| Hole Type | Select between a rectangular and circular hole based on your type of sharpener. |
| Diameter | (circle only) Input a diameter based on your sharpener insert size. |
| Length/Width | (rect only) Input dimensions that avoid overlap with sharpening inserts but overlap edges of sharpener body. |
| Fillet Side 1/2 | (rect only) Control fillets on either side of rectangle. |
| Offset X/Y | Offset hole from center when dealing with off-center sharpening inserts. |
| Chamfer Amount | Control chamfer around hole border. |
It is necessary to adjust all lid values to fit your sharpener.
Offset may take multiple attempts to get right. A simpler solution for uncentered inserts is a rectangular hole bordering the sharpener's top face.
Shaving containers come in a large and small size for both single and double configurations. Ensure you select the correctly configured container for your lid size.
Export (2)Holder and (3)Lid objects separately from Blender. Select one, navigate to File > Export > STL. Ensure “Selection Only” is enabled. Set “Scale” to 1000.
PLA and PETG are interchangeable. Depending on whether you want a clear container, transparent PETG typically produces better results and can be matched with a PLA lid. Keep lid and holder parts a consistent material.
Print all objects as oriented; standard settings, no supports. For transparent parts, these settings are a good starting point (due to print orientation transparency is reduced).
If you input an offset, ensure orientation is correct before attaching holder to lid. Tighten screws firmly without overtightening. Note that plastic threads are strongest on their first use, upon removal it may be necessary to reprint the holder part.
