
Light for Prusa MK3/MK4
Gavin Roach

Найти похожую с ИИ


Профиль печати(0)
Файл модели(0)
 0
0 0
0 0
0
Опубликовано:2025-12-14 17:17:19
0
0



 000
000Need more illumination for your i3 Mk 3 or 4 printer? I needed more light from the front and at a level to illuminate the print as it is being printed.
This bolts on to the front plate of the printer. This supports 2 LED light strips to fully illuminate the print stage. I’m posting this as a remix of Articulating Raspberry Pi Camera Mount for Prusa MK3 and MK2 by Sneaks. This project uses mflink.stl from the original project page. I also used this part as the base for the rotating link male part and the flink light bar. You can use the printed bolts and nuts from the original project but I used the Real Bolts (For Articulating Raspberry Pi Camera Mount) by Adrian Carpenter.
Printed Parts:
I've included stl and 3mf versions of each part. I used 0.40 mm nozzle and a default layer height of 0.20 mm. I printed in PLA but PETG or another engineering filament may work better.
Non printed Parts:
Assembly Notes:
The main consideration in putting this all together is to make sure the print bed and whatever may be on it does not collide with any part of the lights.The main consideration in putting this all together is to make sure the print bed and whatever may be on it does not collide with any part of the lights.
First you will need to remove the two bottom outside 5 mm bolts on the front plate of the printer.

Save these to mount the mounting bar to the printer.
Next assemble the rotating link male parts to the mounting bar using the 2 M5 x 16 hex bolts and nuts. This part needs to be angled at least 35° away from the y-axis to clear the build plate. 45° worked well for me.Next assemble the rotating link male parts to the mounting bar using the 2 M5 x 16 hex bolts and nuts. This part needs to be angled at least 35° away from the y-axis to clear the build plate. 45° worked well for me.
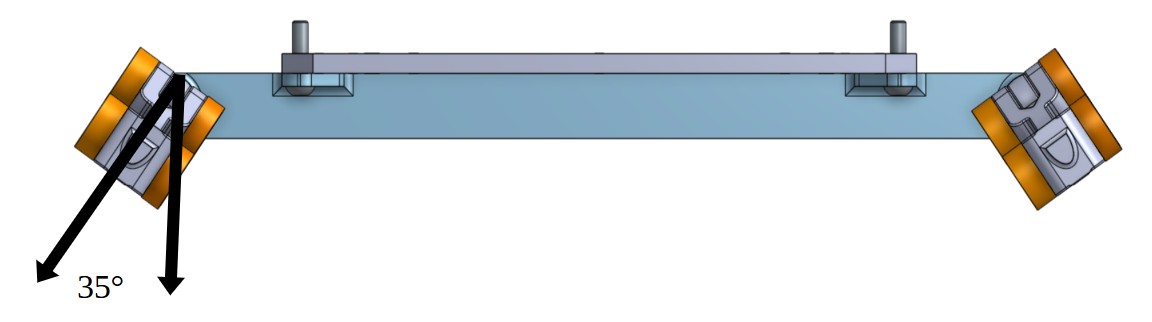
Check the fit and clearances with the other parts and tighten the M5 screws holding the rotating link male parts before attaching the mounting bar to the front plate of the printer. Assemble the links and light bars to suit your needs and circumstances. You can use additional links from the Articulating Raspberry Pi Camera Mount project to locate the light bars where you need them to be. The led strips mount to the light bars using the double stick tape that came with them and a few zip ties to be sure. These led strips can be cut and trimmed to fit the light bars . Make sure to follow the instructions for trimming and wiring.
