
Configurable Bolt Knob
jacob_laurent113

AIで類似品を検索


印刷プロファイル(0)
モデルファイル(0)
 0
0 0
0 0
0
公開日時:2026-05-19 12:05:06
0
0
 000
000I created this so I could rapidly make matching knobs for any hex bolt/nut for my other projects, and they can be found in many of my other models.
I've included my most-used variants here, but you can use the OnShape document to create virtually any configuration you require.
I will also update this collection to add other sizes as I require them. If you need a specific size, you can also request it and I will add it if it make sense to do so.
Please note that the caps are intentionally tight to install, but they will snap in with a bit of force if your printer is tuned correctly. You may have to adjust hole diameter in your slicer - for example "X-Y Hole Compensation" in Creality Print 7. Try increasing it by 0.1-0.2 mm when slicing the knob if you cannot get the caps to snap in, or if you have trouble getting your bolt/nut to fit. For example, I have this set to +0.2mm for most PLA filaments on my Creality K2 Plus to get dimensionally accurate vertical holes.
Select a configuration from the list of available options:

Alternatively, you can open the Configuration Panel by clicking the icon (usually on the right side of the window) to create your own configuration:

Configuration Options
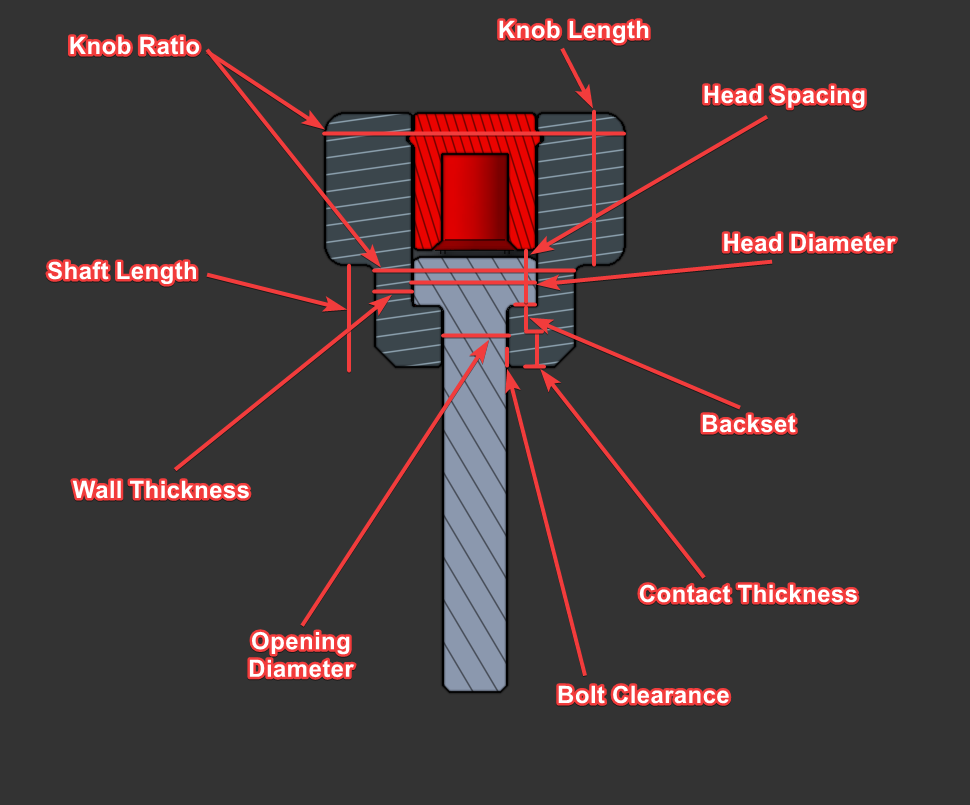
- openingDiameter - Bolt shank diameter, determines the base size for the hole in the end of the knob.
- boltClearance - This sets the free space left around the bolt shaft and head. If it is difficult to insert your bolt, increase this by 0.1 - 0.2mm.
- headDiameter - The minor diameter of the bolt head, i.e., measured from flat to flat.
- shaftLength - The length of the narrow section of the knob.
- wallThickness - The wall thickness of the narrow section of the knob. This determines the thickness against the flats of the head, so be aware that the walls will be thinner at the points.
- knobRatio - This determines the diameter of the knurled portion of the knob (the grip portion) relative to the diameter of the shaft.
- knobLength - The length of the knurled section of the knob.
- backset - This is used to adjust the amount of bolt shank extending out of the knob.
- headSpacing - If this is set to a value greater than zero, the knob cap will be created with the appropriate length to hold the bolt snug to the bottom of the knob. If you don't need it held in place, enter a value of 0mm and the cap will be generated with the minimum thickness of 5mm.
NOTE:
Do not edit the variables in the "Calculated Variables" folder as this will break the knob features.
Once you have selected or created your required configuration, you can export the file for 3d printing.
Right-click the knob in the Parts list and select Export. Repeat for the cap:

Generally, you should export as a .STL file. The file will normally be saved in your Downloads folder.

Update 260215:
Added M6 Short
Update 260221:
Added 3/8 Short
Edit How To
Rename variables in configurator
