
Customizable Lego-compatible text bricks.
Donnaforge

AIで類似品を検索


印刷プロファイル(0)
モデルファイル(0)
 1
1 0
0 0
0
公開日時:2025-05-08 13:59:58
0
0
 100
100Customizable Lego-compatible text bricks
This is a customized LEGO®-compatible rectangular brick with text engraved on all four sides. Of course, you can also use it to create bricks without any text. It can create bricks as small as 1x1x1 (plate height) or as large as 48 x48x18 (6 regular brick heights).
And here's the remix of the key fob for this thing:
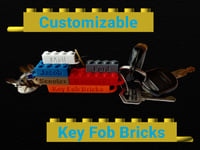
I got a really good fit
All dimensions are accurate, but the customizer has a tolerance parameter, so the dimensions can be adjusted based on your printer/filament to ensure they fit perfectly with each other and with real LEGO® bricks. Real LEGO® bricks have a horizontal gap of 0.2 mm to allow them to connect to each other. For example, a 4x2 brick is 31.8 x 15.8 mm, and a 6x2 brick is 47.8 x 15.8 mm. The tolerance is in addition to the required 0.2 mm gap and is subtracted from both sides of all walls. Therefore,
By default, the customizer only creates Lego-sized bricks. The large nameplate brick in the photo was enlarged to 200% in the slicer and then printed. I have adjusted the text depth parameter in the customizer to half the default value to achieve the required 0.8 mm depth when enlarged. It is recommended to use this depth to avoid extreme overhangs.
Please note that, because I created the bricks in the photo, I added a parameter to specify the spacing between letters. By default, the spacing between them will be greater than that of the bricks in the photo.
Use the customizer
Thingiverse did not run their custom queue from July 10, 2020 to August 4, 2022, and may stop running at any time. Therefore, if they do not process your custom job, you will have to install and run OpenSCAD (free software) on your own computer to process the code and create your own custom model. For more details, please refer to the DrLex instructions linked below.
How to run Customizer on your own computer
If you use OpenSCAD to run code on your own machine, thenYou need to install the font(s) on your system.Here you go. These fonts can be downloaded from the Google Fonts library. The default font for this content can be found at:
https://fonts.google.com/specimen/Roboto
To make the font available for OpenSCAD, you have three options:
1) Install the fonts on the system. The process of installing system fonts depends on the operating system and version you are using (Ubuntu Linux 16.01, Ubuntu Linux 20.04, Windows 7, Windows 10, Mac OS 9, Mac OS X, etc.). If you don't know how to install fonts on your system, please search for instructions online.
2) Add the font files to your font folder and create a folder if it doesn't exist. On Linux, this would be something like "/home/YOURUSERNAME/.fonts", and on Windows 10, it would be something like "C:/Users/YOURUSERNAME/.fonts".
3) Add the font to the folder containing the OpenSCAD file that you want to use the font in. You must also add the 'use <fontname.ttf>' command to the OpenSCAD file, replacing the font's file name with 'fontname.ttf'.
Close OpenSCAD if it's open and you're making the font available, then restart it after you've installed/added the font. The "Help => Font List" menu item in OpenSCAD displays the available fonts, so if it doesn't appear in the list, it's not available and you need to try again.
For more details, please refer to the section on using fonts and styles on the following page:
https://en.m.wikibooks.org/wiki/ OpenSCAD_User_Manual/Text
Printing suggestions
If a brick is going to be connected to other bricks, you don't want it to have an elephant's foot. I usually set the initial layer horizontal expansion parameter in Cura to -0.2 mm to prevent the elephant's foot from appearing.
To get the best-looking bricks, you need to ensure that the top surface of the brick part of the model is printed in a single continuous line from one corner to the other, rather than going around the area where the studs will be added in the subsequent layers. To do this in Cura, set the "Skin Expansion Distance" to "2.2".
The reason for its existence
I've been printing #2456 LEGO bricks as my test filament samples, but they didn't indicate which filament it was, so I couldn't distinguish between two similar ones. Therefore, the idea was born to put text on the side of the LEGO bricks.
 Some of my designs
Click on the image below (it will open in a new tab) or go to the "My Designs" page to view them all.
If you see something you like things,Please click the like button


