Oven Range Burner Locks
Rose Williams

Encuentre similares con IA

Perfil de impresión(0)
Archivo de modelo(0)
 0
0 0
0 0
0
Publicado:2026-03-30 18:10:35
0
0
 000
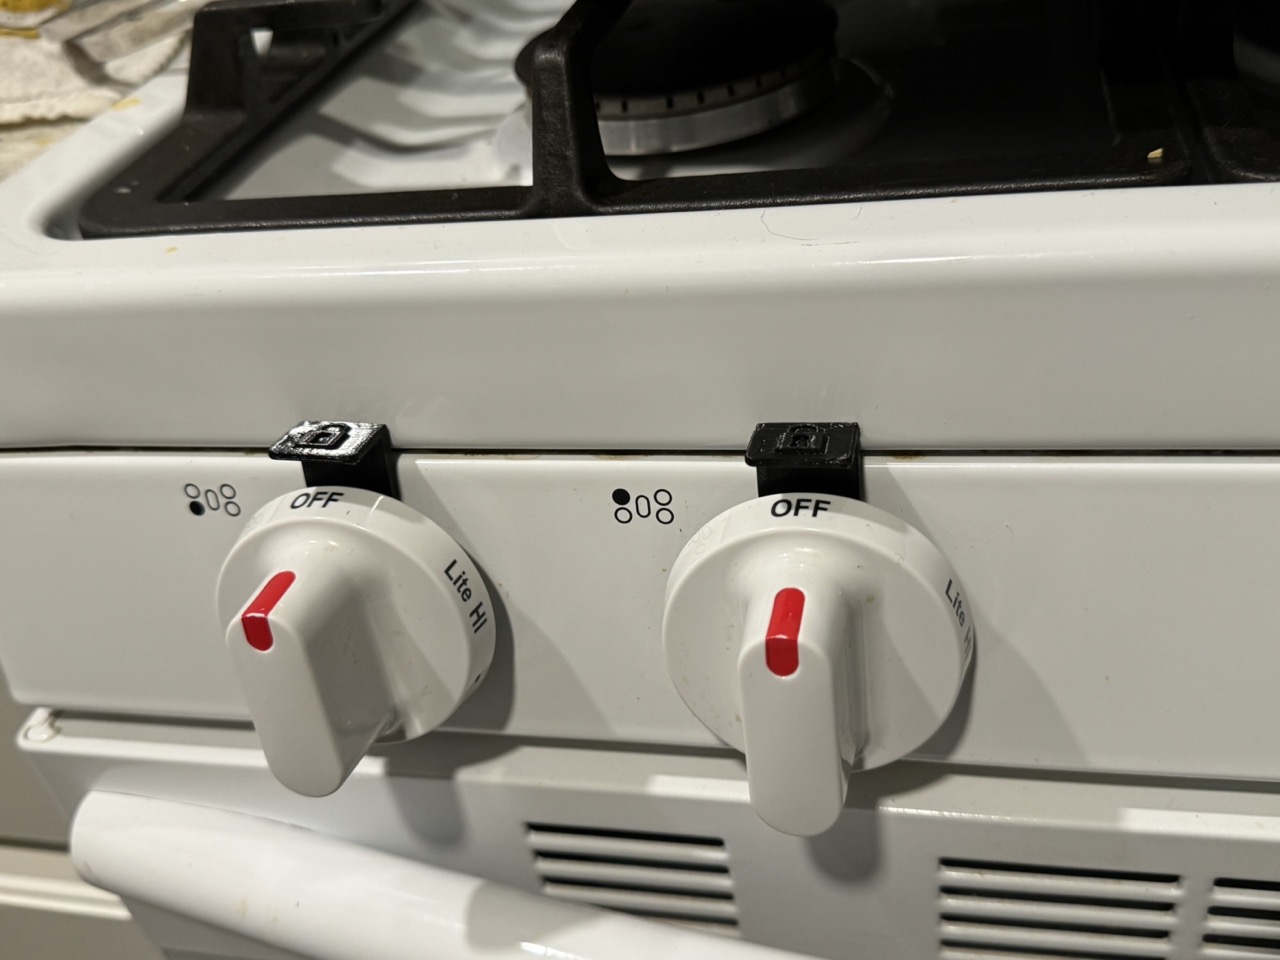
000My dog has accidentally turned on the range burners on my Samsung oven twice while counter surfing. It's quite scary to come home to a house that smells like gas, so I created this spacer and wedge set to help prevent it from happening in the future. The best ways to prevent this from happening are 1) buy an oven that has burners that require more than 1mm depression before turning and 2) keeping your dog and kids away from the oven. But when you own a 3D printer, everything looks like a PETG project. These objects work by blocking the burner knobs from being pressed in so that they can't be turned. These objects will not work if you can turn on your oven by turning the knob without pressing it in first.
Please read the disclaimer below and then continue to the printing and assembly instructions.
Your oven burners may still be able to be turned on while using these 3D printed objects! To minimize the chances of that happening, please verify that the dimensions of the parts are correct for your oven and verify that your burner knob can't be turned each time that you use the lock.
The 3D printed object provided is for informational or personal use only and is provided as-is without any warranties or guarantees. By accepting and using this 3D printed object, you acknowledge and agree that:
No Liability: We accept no liability for any harm, damage, or loss that may arise from the use or misuse of this 3D printed object. You assume all responsibility for the safe and appropriate use of the object.
Not for Critical Use: This object is not intended for any application where failure could result in serious injury, loss of life, significant property damage, or environmental harm.
No Warranty: We make no warranties, express or implied, about the fitness, quality, safety, or reliability of the 3D printed object.
Personal Use Only: This object is intended solely for personal, non-commercial use unless explicitly stated otherwise.
Modification and Reproduction: Any modification or reproduction of the object is at your own risk, and we shall not be liable for any consequences arising from such actions.
Compliance with Laws: You are responsible for ensuring that the use of the 3D printed object complies with local, state, and federal laws and regulations.
Acknowledgement of Risk: You acknowledge that there are inherent risks involved in using 3D printed objects and agree to accept all risks associated with its use.
By using this 3D printed object, you agree to release, indemnify, and hold harmless the creators, distributors, and providers of the object from any and all claims, liabilities, damages, losses, or expenses, including legal fees and costs, arising out of or in connection with your use or possession of the object.
First, ensure that the dimensions of the wedge and spacer are appropriate for your oven. I have included STLs that are appropriate for the oven that I use (Samsung NX58F5500SW) for reference only.
I have also included the F3D file so that you can modify the dimensions. The object has been mostly parameterized, so you may be able to change the dimensions by modifying the parameters rather than changing the model dimensions directly.

I recommend printing out several variations of spacers and wedges with differing thickness and choosing the combination that works best for you.
Print using PETG or other filament type that performs well at higher temperatures. If your oven gets too hot around the knobs, the wedge may deform and not work!
You should print the wedge on its back so that you don't need to use supports.
There is a hollow cavity to insert a magnet into the wedge. I highly recommend doing so in order to keep the wedge securely in place and it's more convenient to slide the wedge out when you need to use the burner. In order to add the magnet, you must pause the print after the cavity has been created and just before the next layer covers it up. Refer to your slicer's documentation for how to add a pause to the print at the appropriate location.

Above: Adding a pause print instruction for the magnet installation with Prusaslicer.
My burner knob is hollow, so I use a spacer, but you may only need to print the wedge if your knobs have a solid back.
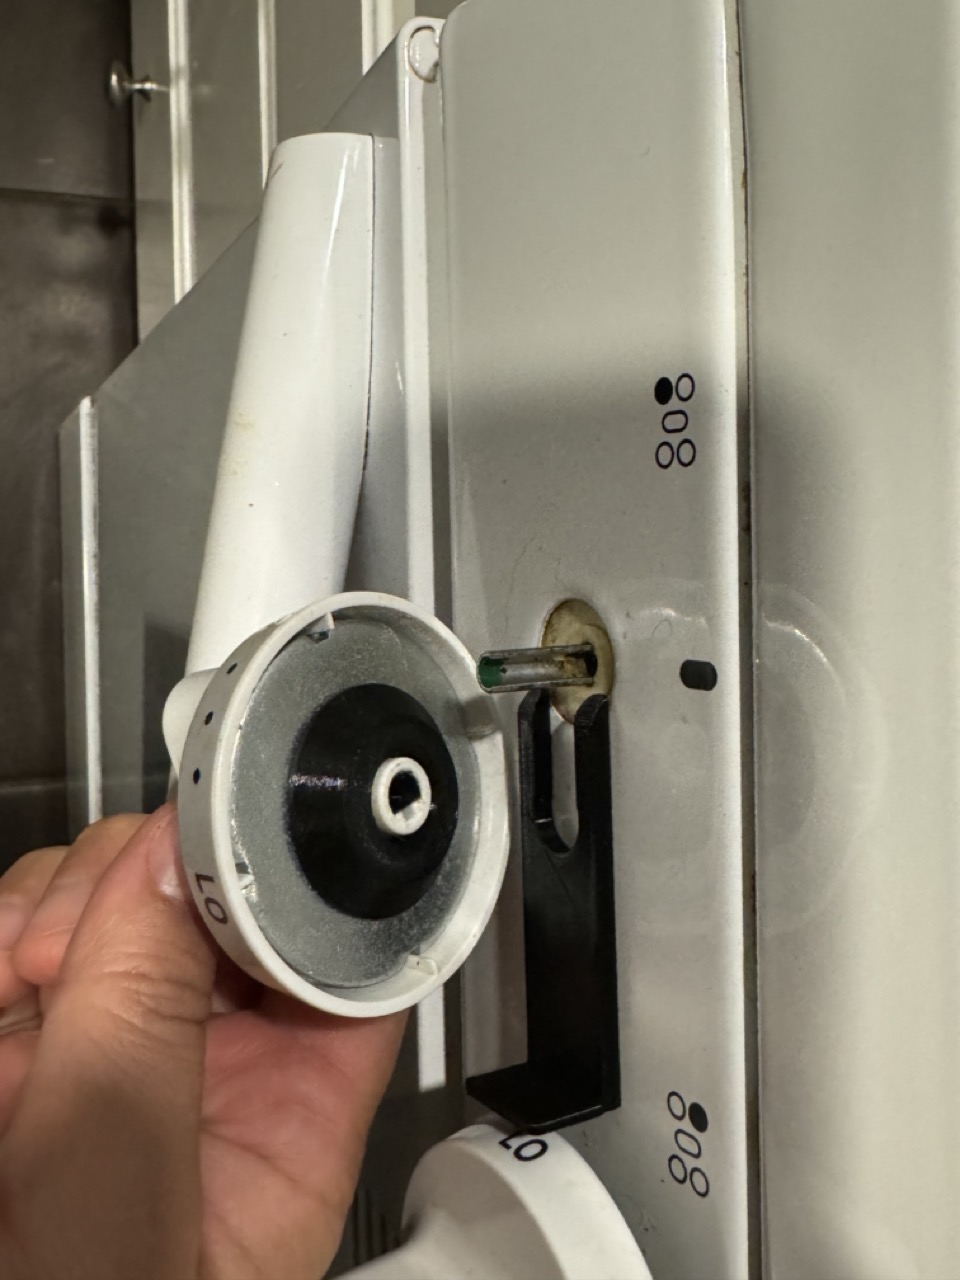
Above: The spacer is added to the backside of the knob. The smaller face should be oriented towards the oven.
Always ensure that the wedge is fully inserted so that it correctly blocks the burner knob from being pushed in!