
MultiBin Spice Rack
vectorutility

Mit KI Ähnliches finden


Druckprofil(0)
Modelldatei(0)
 0
0 0
0 0
0
Veröffentlicht:2026-05-27 05:49:09
0
0
 000
000Hey,
I recently designed these MultiBin compatible spice racks to get my kitchen at least a little bit more organized.
These models are as easy as it gets to print. Just use the settings that work best with your printer. No support required
To me the multiboard ecosystem is pretty confusion and it took me a while to figure out which parts are needed. Below is a complete list of everything required to build a setup like mine.
Multibin Base Plate and Mounting:
Start by printing the MultiBin Base Plates in the size you need.
https://thangs.com/designer/Multiboard/3d-model/8x6%20MU%20%284x3%20LU%29%20-%20MultiBoard%20Square%20Plate-1306836
You can clip together multiple panels with the Dual Clips. There are two variants. The regular dual clips are way stronger, but require quite some force to install. The Lite Dual Clips are easier to install but less strong. Depending on how many mount points you use, this might matter.
https://thangs.com/designer/Multiboard/3d-model/Dual%20Clip-1009275
For Mounting you need the Single Bolt-Lock - ScrewOn Mount:
https://thangs.com/designer/Multiboard/3d-model/6.25%20mm%20-%20Single%20Bolt-Lock%20-%20ScrewOn%20Mount-1046002
These will fit into any mid size hole and allow you to easily un- and remount the entire panel if you need to. I use the Mid Holes - Square Plate Snap that match the Mount.
https://thangs.com/designer/Multiboard/3d-model/Mid%20Holes%20-%20Square%20Plate%20Snap-1306889
You also need some Locking T-Bolt to attach the mount to the plate. I had to scale them down by 1% to make it easier to assemble. Depending on your printer tolerances you might not need to do that)
https://thangs.com/designer/Multiboard/3d-model/Locking%20T-Bolt-1310062
Mounting the Holders
To mount the spice rack, you only need the Locking T-Bolt and the Mid Holes - Square Plate Snap from before.
The spice rocks aligns with the Mid Holes - Square Plate Snap and you can screw it in from behind.
It should be pretty self-explanatory how everything goes together, but here’s a step-by-step guide just in case.
1. Assemble the plate
Print the required base plates in your desired size. Connect them using the Dual Clips.
In my case, the regular Dual Clips were quite hard to install.
What worked best for me:
Applying firm, even pressure from above made installation much easier.
2. Drop in the Plate Snaps
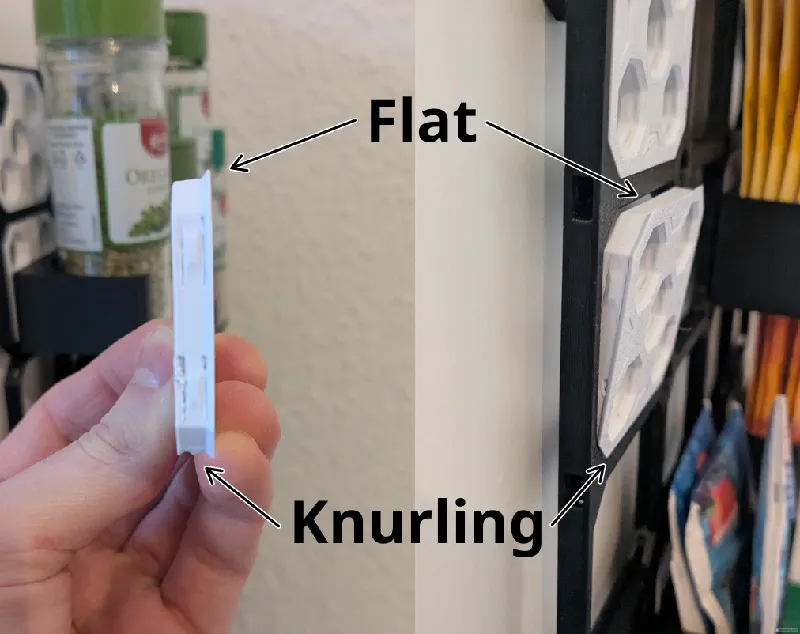
The Plate Snaps have a knurled side and a flat side
I installed mine with the knurled side facing down.
Place the Plate Snaps wherever you plan to attach mounts later.
3. Mounting
Snap the ScrewOn Mount into the Plate Snaps wherever you plan to drill into the wall. Then align the entire panel in its final position and use a pencil to mark the position of the holes to drill. Remove the panel, drill at the marks, and screw the mounts securely into the wall.
Once the mounts are installed, use the Locking T-Bolt to mount the panel. You might want to populate the grid with the holders before mounting the panel. It's generally easier to do that off the wall.
4. Mount the holders
This should be pretty self explanatory now with the previous steps. Screw to the Holders to the Plate Snap with the Locking T-Bol. Make sure everything is flush. Now snap them in like described above.
If you need the holders in slightly different variations, feel free to leave a comment or send me a PM.
The models are fully parameterized, so creating custom variations should be straightforward.
I’ve also included the STEP file and my FreeCAD project file in the CAD Files folder, so you can easily modify and customize the design to fit your needs.
