
The Beer Altar
Penelope Oakes

Mit KI Ähnliches finden


Druckprofil(0)
Modelldatei(0)
 0
0 0
0 0
0
Veröffentlicht:2026-02-10 20:34:19
0
0
 000
000Easy to print, requires electronics and some soldering and drilling.
This ia a rather complex build and it requires some electronics. All electronics are available via Alibaba.
| 6x | M3x12 Button head screws |
| 6x | M3 washers |
| 1x | Hexagonal acrylic glass, 100mm / 4inch |
| 1x | 3W LED Module |
| 1x | Adjustable constant current regulator |
| 1x | 1A USB charger module |
| 1x | LiPo Battery with 1Ah or more to keep the charge rate ≤1C |
| 1x | 100k Resistor |
| 1x | Switch |
| Insulated copper wires | |
| Shrink wrap |
No supports, 0.2mm layer height works good. Only tried PLA so far but PETG should work too.
There are quite a lot of files in this model, here is an overview of what you are going to need.
You will need this part for every coaster you build. There is only one version. Just 3 different files, the model (STL) the model with Prusa Slicer settings (3MF) and the gcode for a Prusa MINI+
You will need only one even if you make many coasters. It is a tool to get the holes in the acrylic cover right.
Here it gets a little complicated. You need one cover per coaster. You can choose your design. There is a simple one without any writing or symbols as well as some pop culture designs including Ingress, Game of Thrones and Harry Potter. Use the included scad file to create your own. Be sure to include a filament change to make the pattern stand out.
The build requires drilling of the acrylic part, putting the electronics together, then put it in the tray and put the cover and acrylic hexagon on and screw it together.
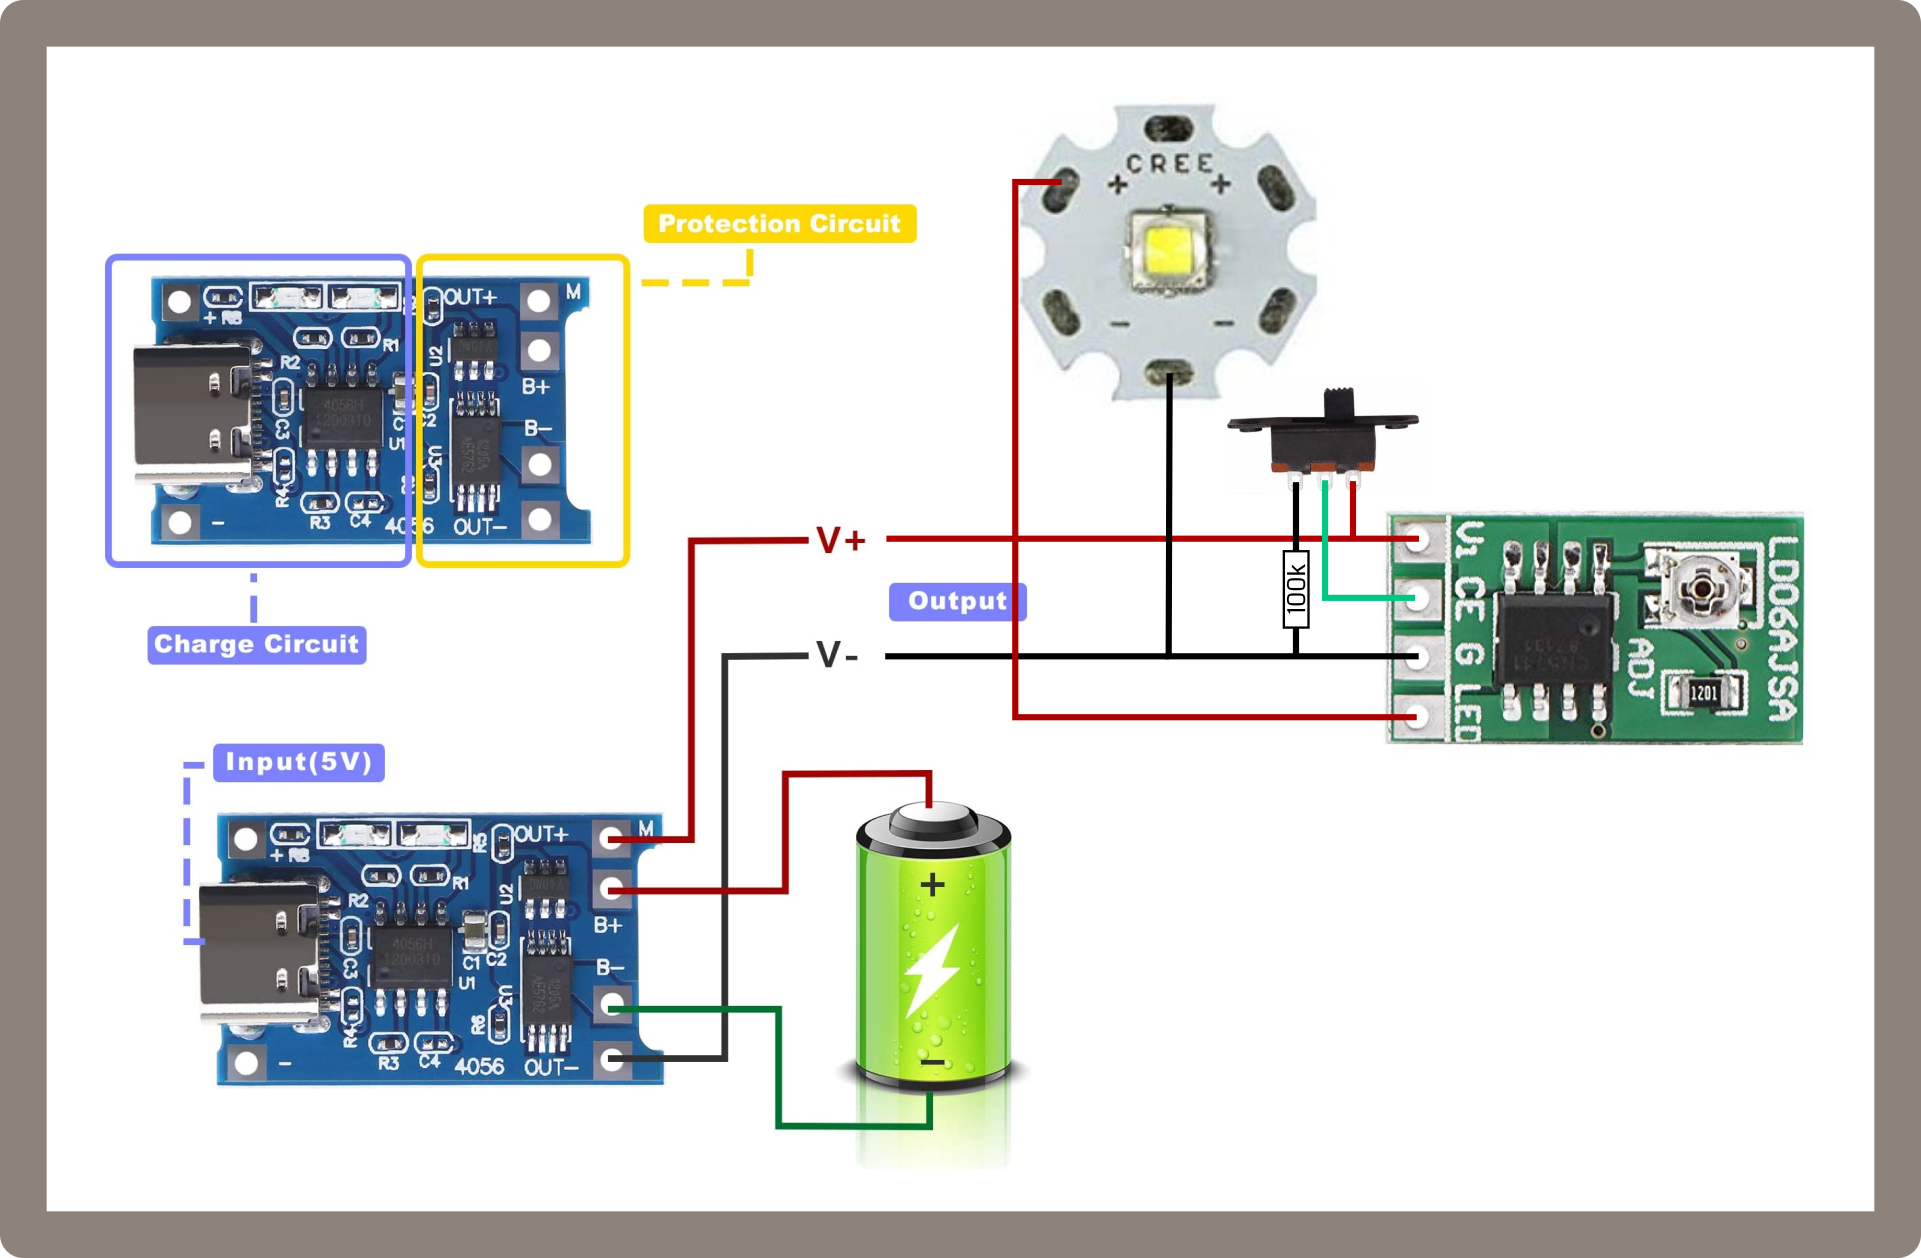
Wiring as shown in the diagramm. The 100k pulldown resistor is required so that the CE labeled input does not react to static charge when turned off. I used the 3 solder pads of the LED as distributor for ground.
I had to turn the adjustable constant current driver all the way down and set it to 0.11A. In theory, the battery should last for 10 hours then.
Print the tray first and lay out the parts in it to get the length of the wires right.
Don't forget to charge the battery and test the circuits.
Put the acrylic glass part and the cover into the drilling jig and drill 3mm holes. Don't use much force or the part will break.
Place the electronics into the tray and put the cover on. Then put the drilled acrylic part on and use washers and screws to hold it together.
Done! No go grab a beer and try the coaster!
The models are made to fit the PCBs I got, so if you use others, you may want to adjust them or use the “Empty” designs and modify them to fit your components. You can of course grab the design from Onshape and edit the dimension s of the PSBs, the design should adapt accordingly but no guaranties.
I have included a little OpenSCAD file to put an inscription on the top of the coaster. Available Themes are Enlightened, Resistance, Game of Thrones and Harry Potter as well a one with 4 lines of arbitrary text. Res and Enl texts can also be edited from the configurator to allow for adaptation to events or groups. I was not able to find any licencing information along with the fonts so I assume “public domain”.
The green filament in the pictures is a glow in the dark type hence the afterglow around the LED. Please share your cool drink-pictures along with your makes!
