
Curling Tower - Prevent Curling!
PepperGuild17

Mit KI Ähnliches finden


Druckprofil(0)
Modelldatei(0)
 0
0 0
0 0
0
Veröffentlicht:2026-07-28 17:27:58
0
0
 000
000FULL EXPLANATION HERE: https://www.reddit.com/r/FDMminiatures/comments/1v0rerw/introducing_the_curling_tower_a_simple_solution/
This is a “Curling Tower” - A Model designed to combat “Curling”, especially when printing Miniatures.
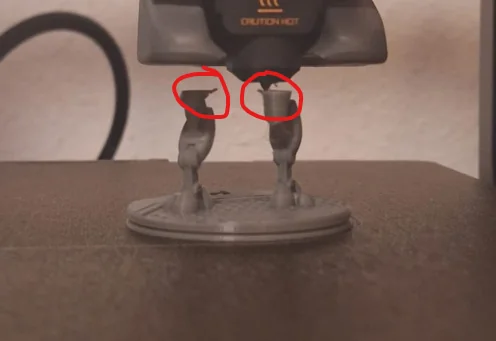
What happened here?
When 3D Printing Miniatures with an FDM Printer, we run into some unique issues. One of which is the fact that even though it takes a long time to finish the print, the time spent on each individual layer is fairly short. Ideally, by the time the current layer starts printing, the previous one should have cooled down as much as possible. Now, if you're printing something large this isn't a problem - By the time the nozzle circles back to the starting point of the next layer, the previous one will have solidified.
But, as you can probably guess, this isn't always the case for miniatures. It usually doesn't affect the entire model - Most of them are still large enough that the Layers will have enough time to cool down. Where it becomes an issue is with "isolated" parts of the model - Parts that are either only partially connected to the Model, or only become fully connected throughout the print. Examples of partially connected isolated parts are but are not limited to Swords raised towards the sky, Staffs and other weapons. Examples of isolated parts that only become fully connected throughout the print, are usually legs or similar body-parts.
But what exactly is Curling, and why is it such an issue?
When printing these isolated parts, the time spent on each layer is very short - So short that by the time, say Layer 100 starts, Layer 99 hasn't fully solidified yet. The heat of the Nozzle as well as the new layer of filament being placed on top of the previous Layer will re-soften the material further, causing the layer to be slightly lifted upwards. If this happened only once, it wouldn't be a major issue - The lift per layer is relatively small. But if it happens over multiple layers it becomes a problem. Eventually the filament will be curled enough for the Nozzle to slam into it, at which point it will most likely break of that part and ruin the print. With print times reaching the double digits, this is - as you can imagine - moderately upsetting.
So how do we fix it?
There are four common solutions to curling:
While all those four solutions work, I wasn't satisfied with any of them. The first two are limited by Hardware which, in some cases, simply isn't enough. The other two force you to print something other than what you actually wanted to print. So, I wanted to use a compromise.
The Curling Tower - It's just a simple, hollow, square tower with thin walls. The idea here is simple - You print it alongside your actual model, with some distance between the two. Once the Printer has finished a layer for the Model, it will move to the Tower, giving the Filament on the Model enough time to cool down. Now, you might be thinking - That's just Solution #4 again, printing with more than one model at the same time.
And you're right - But there is a catch.
Because the Curling Tower is much more basic than any miniature, there isn't a whole lot that can go wrong with it. It's "safer" to print alongside your actual print, because there can't be any failed supports, harsh overhangs or even curling. And, because it's such a simple design - it will add significantly less time to the total print duration than a second, actual miniature would.
But the real difference and big advantage, is that the Tower is adjustable. Remember when I said that Curling mostly affects the isolated parts of the model? In this case, it's the leg of the Skeleton - You don't need to print the entire Tower. You can just match the height of the tower to the point where the isolated part re-connects with the model and is out of the "Danger Zone"
This means that you will have all the benefits of the "Cooling Buffer" that Solution #4 gives you, at a fraction of the increase in print time and material waste. To give you some numbers:
That's an increase of only 13% when compared to the 86% increase you'd get when printing with a 2nd model.
Now, is this something that you should use for all of your prints? No, of course not - Although in theory, it should also very slightly improve Overhangs for the same reason it fixes Curling - By giving them more time to cool before the next layer is added on top. But this is primarily meant as a tool for models that have a lot of isolated parts, or if you are struggling with Curling and none of the other solutions work out for you. So next time you're running into Curling even though your fans are already maxed out - Give this one a try.
